Easy and very clever way to share large files with others

Documents and files sharing are very frequent nowadays. We share & transfer documents all day long, and this behaviour intensified during the confinement's period.
Sending an email attachment of ordinary size is a no-brainer. But what if your message is too large and therefore can't be transferred via email? What if you don't want to upload anything to the internet and you only want is to give your a file and tell him, "Hey, here is your file 😄 ".
The article will answer the above question in a very easy, clever and secure way to share files with others, all without uploading anything to the internet. Let's get the hands dirty!
Conceptual explanation
The solution we are going to present in the next section is based on a very simple, yet clever principle: instead of uploading the file(s) to internet (whether via google drive, weTransfer, easyupload.io, dropbox, or email clients like gmail, outlook etc) we are going to expose the file(s) directly from our own computer, and we will send a simple url to our recipient (security is optional but is highly recommended and will be explained in the following section, no rush).
Hence, this will help us avoid the upload step completely (and we all know that generally speaking, upload speed is always inferior to download's one).
Technical solution
Definition
The solution is based on a command line tool called ngrok, that's very easy to install & to set up and it's compatible to all operating systems (Linux, Windows & MacOs).
Geeky note 💡
ngrok is a
a globally distributed reverse proxy fronting your web services running in any cloud or private network, or your machine.
For more documentation, here is he official page https://ngrok.com/docs
Practical setup & examples
Setup
To use ngrok to serve your file(s) to your recipients, you need to install and properly configure it. This a one-time thing to do on your computer:
- Installation: go to download page https://ngrok.com/download , choose your operating system and follow the instructions on how to do this. It's a straightforward process.
2. Configuration: once installed, you need to create an account https://dashboard.ngrok.com/signup (you are free to sign up using google, github or choose to create a classic account using an email & password) and then, you need to setup the authentication in your computer. This is done by copy/pasting an already prepared authentication command shown in the dashboard https://dashboard.ngrok.com/get-started/setup.
As an example: here is my already prepared authentication command:
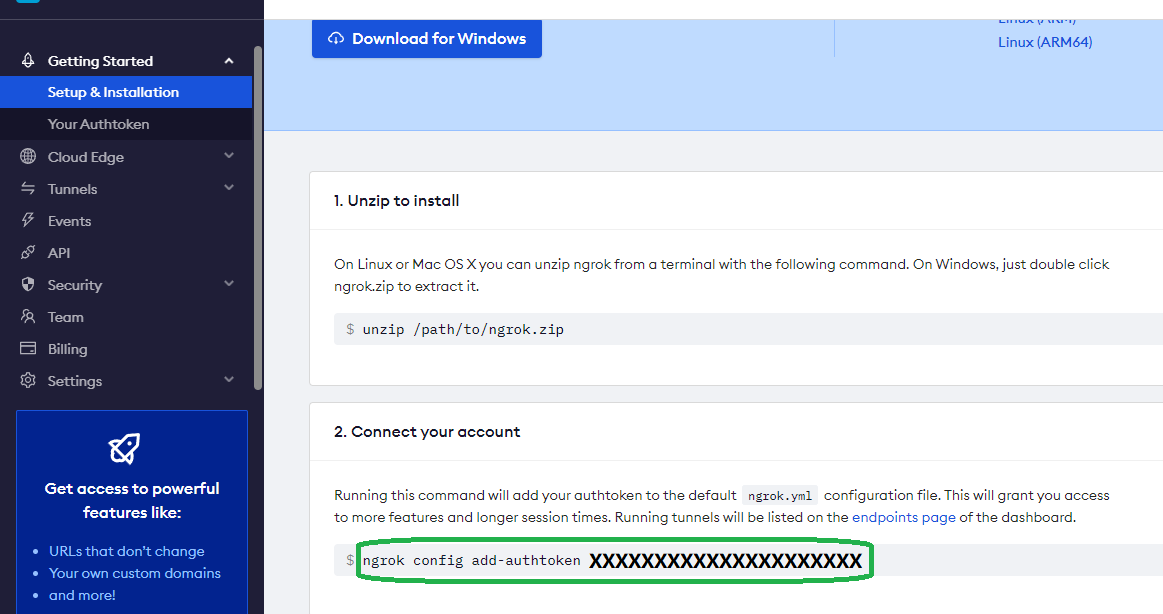
Here, here is the command as a plain text:
ngrok config add-authtoken YOUR_SECRET_IDENTIFIER_HERENow, once the command is copied, we need to paste it somewhere. This somewhere is the command line of your computer. If you are a Linux/MacOS user, wether you're a beginner and starting with Linux terminal, or someone who's familiar with it, I assume this is a very trivial thing to do; you should open a terminal tab, paste the command and click enter.
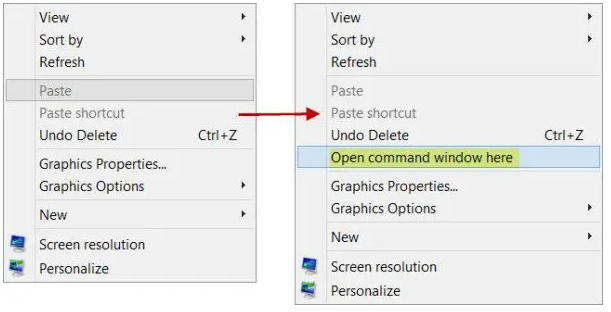
For Windows users, I assume that you are not very familiar with windows powershell. So what you need to do is:
- Run a ngrok session from the folder in which you previously extracted it. For example; if ngrok was extracted to your Downloads folder, you have to hold down the Shift key, and right-click on the folder's name. You will get new options. The one we are looking for is the "Open command window here":
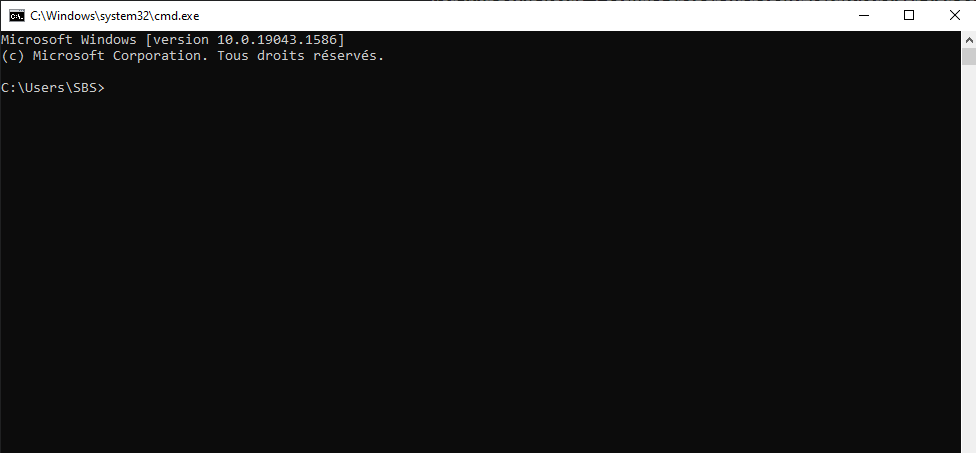
2. You will get this black screen (or a similar blue one):
4. add ".\" to the beginning of the previously copied command and past the result:
.\ngrok config add-authtoken YOUR_SECRET_IDENTIFIER_HERE5. Sumbit (click Enter)

Now, if you followed the previous steps, you should have a success message, similar to: saved to configuration file .....
Now, you should have a working ngrok setup. The previous steps are only to be executed when you're just installing it. Now, the good part is here. Let's share our file(s)!
File sharing
To share files, you will create a folder named "Shared". This folder would contain the files that you want to share with your recipients.
Once the folder is created and there are some files in it, you will use the following command, and only replace the PATH_TO_SHARED_FOLDER with your respective one. The basic command for this is
.\ngrok http file://PATH_TO_SHARED_FOLDERFor example, let's suppose that we have a folder named “documents” in your desktop. This folder contains a file named “orders.csv”.
To expose documents's this folder content, you need to grab the absolute path to your shared folder and run a command depending on your operating system:
Linux/MacOS example
you need to sue the aboslute folder's path, starting from "/". For example, if the documents folder is in your user's john home directory:
.\ngrok http file:///home/john/documents
Windows example
you need to sue the aboslute folder's path, starting from "C". For example, the documents folder is in your user's john home directory:
.\ngrok http file:///C:\Users\John\documents
To get your shared absolute path, please refer to this aricle
Once you run the command, you will get a screen similar to this:
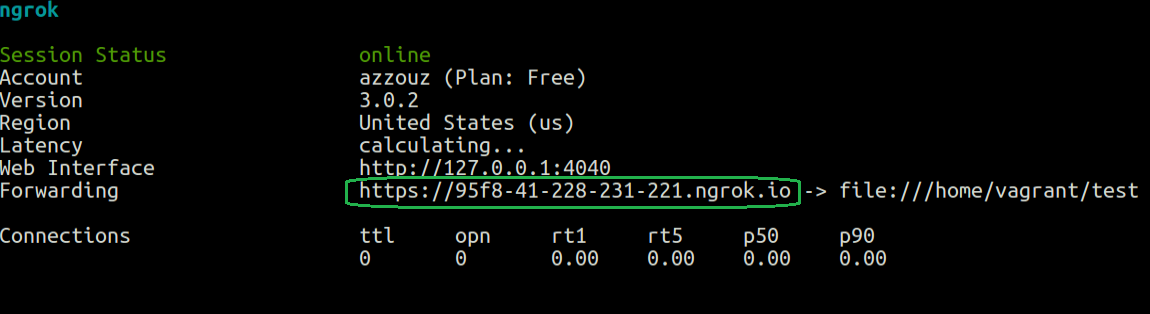
What is ngrok telling us, is -basically- "hi, user XXX, I exposed your local folder to a public internet url, here is it https://bf6c-41-228-231-221.ngrok.io" :)
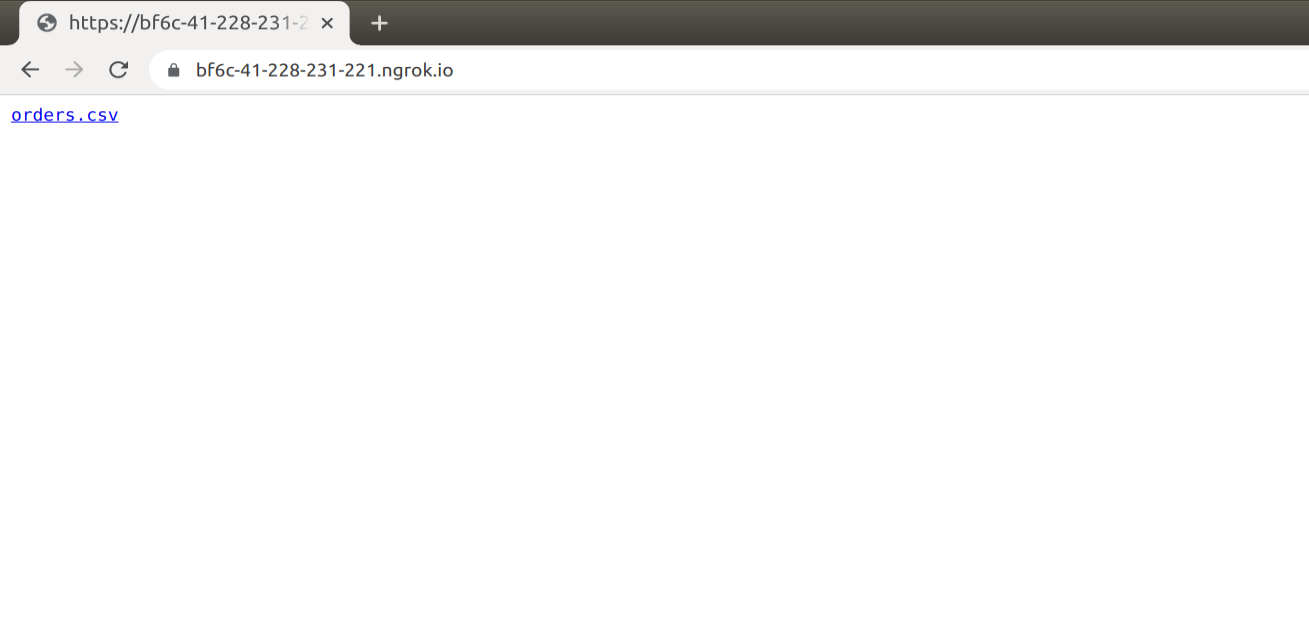
If you try to access this link using your browser, you will get this page, fromwhch you can simply click and download the orders.csv file. Bingo! ✨✨
Securing our shared folder
You must be wondering: how are you going to secure the file and only provide the recipients the permission to access it? Absolutely legit! For this, we will add a user & password protection to access our shared folder.
This is simply done by changing the previous command, and adding some secure parameters, like below: (in green)
.\ngrok http --basic-auth="user:password" file://PATH_TO_SHARED_FOLDERThis way when you execute this command, and share the public url that you get to any user, no one would be able to authenticate to see your folder's content only with the user & password that you set up. They will see this:

so what you need to do is send the public url along with the authentication parameters (user & password) to your recipients. That's it.
The sad news is that the securing mechanism was free, but now it's a paid feature ($25 per month). But regardless, you get the point.
📝 Tips and helpful notes:
- To exit ngrok and stop the tunnel, click the "q" button
- 2. Your tunnel must be up so recipients could finish the file's download
- In the free plan, everytime you restart ngrok, you will get a randomly generated url. A custom or static url is a premium feature.
Conclusion
In this article, I shared with you a very simple and clever way to share files with others, a process that doesn't involve an uploading step. The length of this post might make the process look complicated, but the truth is that it's not, as I tried to describe all the nitty-gritty things with an example.
I hope that you found this helpful. Your feedback is highly appreciated and I'm here if there is anything that needs further explanation. Happy Sharing! ❤️